Passkeys
Passkeys are cryptographic key pairs created on end-user devices. Apple and Google are two major industry players pushing for the passkeys standard, which means that passkeys are widely available on consumer devices such as:
- iPhones / iPads / Macbooks
- Android phones / tablets
- Chrome (on Windows / Mac / Android)
See here for a full list of systems that support passkeys.
The biggest value-add of passkeys, in the context of Web3, is saving users from manually managing and securing their private keys. Instead of writing down 12-word seed phrases, your user can simply use a passkey-enabled device to manage their wallet, and trust that the hardware will safely store the passkey, and the hardware vendor (e.g. Apple/Google) will securely backup the keys.
Demo
-
Passkeys
-
Passkeys + Session Keys
- Demo
- Source code
- Read here for why you want to use passkeys with session keys.
How ZeroDev supports passkeys
ZeroDev/Kernel supports using passkeys as signers. The support comes in two flavors:
-
Native passkeys using precompiles via RIP-7212 on rollups and EIP-7951 on Ethereum. Native passkeys are the best option when available, since it uses the least amount of gas (only 3450 gas for verifying a P256 signature). See here for a list of chains that support native passkey precompiles.
-
Smart contract passkeys using either the Daimo or FCL implementation. Smart contract passkeys can work on all EVM networks, but they are expensive (300-400k gas for verifying a P256 signature).
ZeroDev implements passkey supports through a progressive passkey validator, which uses native passkeys if ERC-7212 is available, and falls back to smart contract passkeys otherwise. Notably, this means that if you use passkeys on a network where ERC-7212 isn't available, and the network later adds support for ERC-7212, you don't need to upgrade your validator -- it will automatically start taking advantage of the ERC-7212 precompile.
Quickstart
Follow this tutorial to get started with passkey smart accounts.
Installation
npm i @zerodev/passkey-validatorAPI
Setting up passkey server
In this tutorial, we will be using ZeroDev's passkey server. If you want to use your own passkey server, read this. If you wonder why a passkey server is needed at all, read this.
Head to the ZeroDev dashboard, select a project, and copy the passkey server URL:
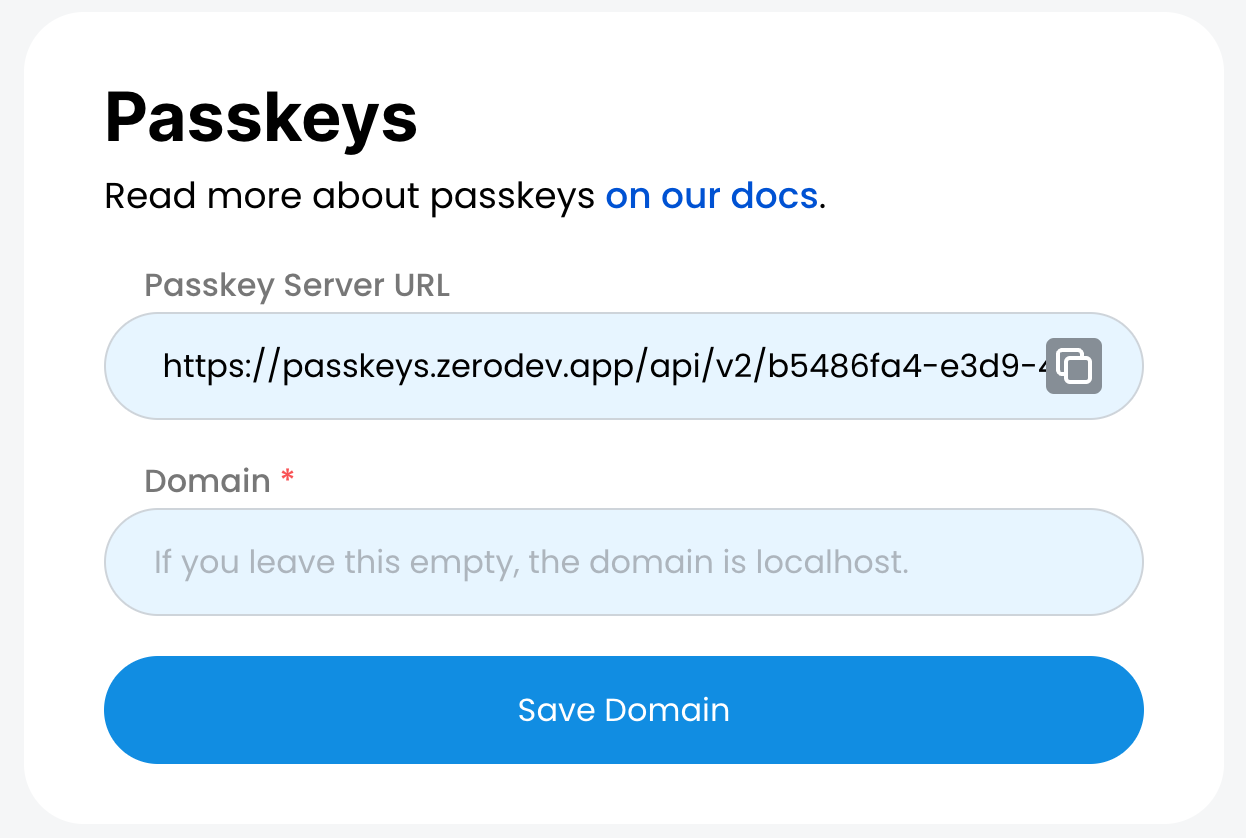
If you are testing on localhost, just leave the domain empty. If you are deploying to a domain, enter and save the domain.
Creating a new passkey
import { toPasskeyValidator, toWebAuthnKey, WebAuthnMode, PasskeyValidatorContractVersion } from "@zerodev/passkey-validator"
import { KERNEL_V3_3, getEntryPoint } from "@zerodev/sdk/constants"
const webAuthnKey = await toWebAuthnKey({
passkeyName: "passkey name",
passkeyServerUrl: "your passkey server URL",
mode: WebAuthnMode.Register,
passkeyServerHeaders: {}
})
const passkeyValidator = await toPasskeyValidator(publicClient, {
webAuthnKey,
entryPoint: getEntryPoint("0.7"),
kernelVersion: KERNEL_V3_3,
validatorContractVersion: PasskeyValidatorContractVersion.V0_0_3_PATCHED
})toWebAuthnKey will prompt the user to create a passkey with the given name.
Using an existing passkey
import { toPasskeyValidator, toWebAuthnKey, WebAuthnMode, PasskeyValidatorContractVersion } from "@zerodev/passkey-validator"
import { KERNEL_V3_3, getEntryPoint } from "@zerodev/sdk/constants"
const webAuthnKey = await toWebAuthnKey({
passkeyName: "passkey name",
passkeyServerUrl: "your passkey server URL",
mode: WebAuthnMode.Login,
passkeyServerHeaders: {}
})
const passkeyValidator = await toPasskeyValidator(publicClient, {
webAuthnKey,
entryPoint: getEntryPoint("0.7"),
kernelVersion: KERNEL_V3_3,
validatorContractVersion: PasskeyValidatorContractVersion.V0_0_3_PATCHED
})toWebAuthnKey will prompt the user to select an existing passkey.
Creating Kernel accounts
Now you can proceed to create Kernel accounts using the passkey validator as the sudo validator.
FAQs
Can I use passkeys with session keys?
Yes! Check out this demo and the source code.
Using passkeys with ECDSA session keys has multiple benefits:
-
If ERC-7212 hasn't been deployed on your network, passkeys can be expensive. With session keys, UserOps can be sent through ECDSA keys very cheaply. You only need to pay for the passkey validation cost once when you create a session key.
-
Your users don't have to deal with passkey signing prompts for every UserOp.
Why do we need a passkeys server?
A passkey is generated from a client-server handshake. In theory, we could simulate the handshake on the frontend, then store the public key on-chain. However, storing the public key on-chain involves sending a transaction, so you would want to do that as a part of deploying the account. However, if you must deploy a passkey account before you can use it, that breaks one of the core optimizations of AA which is counterfactual deployment -- the ability to use the address of a smart account without first deploying it.
We are working on ways to remove the dependency on a passkey server. In the mean time, keep in mind that the centralization concern is mitigated by the following:
- You can use your own passkeys server.
- The passkeys server only stores the public authentication data. Even if it's compromised, your users's keys are stored on their devices only.
If the passkey server is lost, only users who have not yet deployed their accounts (i.e. users who have been using accounts counterfactually) will be unable to recover their accounts. Users who have deployed their accounts will have their authentication data stored on-chain, so their accounts will be safe even if the passkey server is lost.
How do I use my own passkeys server?
You can optionally implement your own passkey server. To do that, make sure that your server implements the following URLs:
/register/options: Generate and return registration options to the client. The client will use these options to prompt the user to create a passkey. If you are utilizing the @simplewebauthn/server library, thegenerateRegistrationOptionsfunction can be used for this purpose. During this process, consider generating and storing a unique userID for later database reference.
import { generateRegistrationOptions } from "@simplewebauthn/server"
const options = await generateRegistrationOptions({
rpName, // your app name
rpID, // your app domain
userID, // a unique user ID
userName, // user name (passkey name)
userDisplayName,
authenticatorSelection: {
residentKey: "required",
userVerification: "required",
authenticatorAttachment: "platform",
},
})
return options/register/verify: Verify the registration response (cred) and return the results to the client. TheverifyRegistrationResponsefunction is also available for this verification. Upon successful verification, store the user's credentials, such as pubKey and credentialId, in your database.
import { verifyRegistrationResponse } from "@simplewebauthn/server"
// get credential from request
const { cred } = await request.json<{
cred: RegistrationResponseJSON
}>()
const clientData = JSON.parse(atob(cred.response.clientDataJSON))
const verification = await verifyRegistrationResponse({
response: cred,
expectedChallenge: clientData.challenge,
expectedRPID, // your app domain
expectedOrigin: c.req.header("origin")!, //! Allow from any origin
requireUserVerification: true,
})
if (verification.verified) {
// save the user credential like pubKey, credentialId to your database
// ...
// return the verification result
return { verification }
}
// return 401 error if the verification is failed/login/options: Generate login options, including a challenge for verification, and return them to the client. ThegenerateAuthenticationOptionsfunction will assist you in creating these options.
import { generateAuthenticationOptions } from "@simplewebauthn/server"
const options = await generateAuthenticationOptions({
userVerification: "required",
rpID: domainName,
})
return options/login/verify: Verify the login response (cred) and report the outcome to the client. Use theverifyAuthenticationResponsefor the verification process. In the event of successful verification, retrieve the new counter from authenticationInfo and update the user's credentials in your database. It's crucial to send both the verification result and the user's public key back to the client, as the public key is not known to the client during the login process.
import { verifyAuthenticationResponse } from "@simplewebauthn/server"
const cred = await request.json<{
cred: AuthenticationResponseJSON
}>()
const clientData = JSON.parse(atob(cred.response.clientDataJSON))
// get user credential from your database
const user = await userRepo.get(userId)
const credential = user.credentials[cred.id]
const verification = await verifyAuthenticationResponse({
response: cred,
expectedChallenge: clientData.challenge,
expectedOrigin: c.req.header("origin")!, //! Allow from any origin
expectedRPID: domainName,
authenticator: credential,
})
if (verification.verified) {
// get new counter
const { newCounter } = verification.authenticationInfo
// update the user credential in your database
// ...
// return the verification result and the user's public key
return { verification, pubKey: credential.pubKey }
}
// return 401 error if the verification is failedThen, you can pass your server URL as passkeyServerUrl.
// creating a new passkey
const webAuthnKey = await toWebAuthnKey({
passkeyName: "passkey name",
passkeyServerUrl: "your passkey server URL",
mode: WebAuthnMode.Register,
passkeyServerHeaders: {}
})
// using an existing passkey
const webAuthnKey = await toWebAuthnKey({
passkeyName: "passkey name",
passkeyServerUrl: "your passkey server URL",
mode: WebAuthnMode.Login,
passkeyServerHeaders: {}
})
// create passkey validator
const passkeyValidator = await toPasskeyValidator(publicClient, {
webAuthnKey,
entryPoint: ENTRYPOINT_ADDRESS_V07,
kernelVersion: KERNEL_V3_3,
validatorContractVersion: PasskeyValidatorContractVersion.V0_0_3_PATCHED
})If you want to refer to the ZeroDev passkey server implementation, you can find it here
How are passkeys sync-ed and recovered?
Synchronization and recovery are both supported natively by Apple and Google:
-
With Apple, Passkeys created on one device are synced through iCloud Keychain as long as the user is logged in with their Apple ID. Apple covers both syncing and recovery in "About the security of passkeys". For some additional detail, see this Q&A with the passkey team. Apple's account recovery process is documented in this support page.
-
With Google, Google Password Manager syncs passkeys across devices seamlessly. Google has plans to support syncing more broadly across different operating systems, see this support summary. Recovery is covered in this FAQ ("What happens if a user loses their device?"): it relies on Google's overall account recovery process because passkeys are attached to Google accounts.
Chains with Native Passkey Precompiles
This is an incomplete list of chains that support native passkey precompiles via RIP-7212 or EIP-7951:
Mainnet
- Ethereum
- OP Mainnet
- BNB Smart Chain
- Unichain Mainnet
- Polygon
- Monad Mainnet
- Ethernity Mainnet
- Mint Mainnet
- opBNB
- ZKsync Era
- Shape
- Flow
- Perennial
- Story
- Abstract
- Edge Mainnet
- Mantle
- ZetaChain Mainnet
- Polynomial Mainnet
- B3 Mainnet
- Base
- Warden Protocol
- Apechain
- mode-mainnet
- Arbitrum One
- Arbitrum Nova
- Celo
- Hemi Network
- Avalanche
- Ink
- Linea Mainnet
- BOB
- Onyx
- plume
- Scroll
- Katana
- Degen
Testnet
- Binance Smart Chain Testnet
- Ethernity Testnet
- prod-testnet
- mode-sepolia
- Unichain Sepolia
- Story Aeneid
- vector-chain
- Mantle Sepolia Testnet
- MegaETH Testnet v2
- Monad Testnet
- Ethereum Holesky Testnet
- Incentiv Testnet
- Curtis Testnet
- Avalanche Fuji
- Linea Sepolia Testnet
- Polygon Amoy
- Base Sepolia
- plume-testnet
- Arbitrum Sepolia
- Scroll Sepolia
- Open Campus Codex
- Hemi Sepolia
- Ink Sepolia
- Sepolia
- OP Sepolia
- Arbitrum Blueberry